How could I filter water from a Eva-Dry 1100 Petite Dehumidifier?
The Eva-Dry 1100 Petite Dehumidifier collects water from the air through condensation, but the collected water isn't immediately safe for drinking due to potential contaminants. Here’s how you can filter and purify the water for safe use:
Step 1: Collect the Water
- The Eva-Dry dehumidifier has a water reservoir where condensation accumulates.
- Empty this water into a clean container for further filtration.
Step 2: Filter Out Particulates
- Basic Filtration: Pass the water through a coffee filter or fine mesh to remove dust or small debris.
- Carbon Filtration: Use an activated carbon filter (like those in water pitchers or aquarium filters) to remove odors, chlorine, and organic contaminants.
Step 3: Kill Bacteria and Microorganisms
- Boiling
- Boil the water for at least 5 minutes to kill bacteria, viruses, and parasites.
- UV Sterilization
- Use a UV-C light sterilizer (commonly found in water purification pens) to disinfect the water.
- Chemical Treatment (Optional)
- Add water purification tablets (like iodine or chlorine dioxide) if storing water for later use.
Step 4: Improve Taste and Safety (Optional)
- Pass the purified water through a charcoal filter to remove any remaining taste or odor.
- Consider using a reverse osmosis (RO) system for even higher purity.
Final Notes
- Not recommended for drinking long-term unless purified properly.
- Dehumidifier water may contain trace metals and mold spores from the air.
- Best suited for non-potable uses (e.g., watering plants, cleaning, or humidifier refills).
Would you like a DIY filtration system design for continuous purification? 🚰
Here’s a DIY filtration and purification system to make water from your Eva-Dry 1100 Petite Dehumidifier safer for drinking.
DIY Dehumidifier Water Filtration System
Materials Needed:
Filtration Stage
✅ Coffee filter or fine mesh (removes dust and debris)
✅ Activated carbon filter (removes chlorine, VOCs, and odors)
✅ Sand and gravel filter (optional for extra pre-filtration)
Purification Stage
✅ Boiling setup (stovetop or electric kettle)
✅ UV-C light sterilizer (for killing bacteria/viruses)
✅ Reverse osmosis (RO) filter (optional for high purity)
Storage & Dispensing
✅ Glass or BPA-free plastic container (to store filtered water)
✅ Silver or copper coin (helps prevent bacterial growth in stored water)
Step-by-Step Guide:
Stage 1: Pre-Filter (Removing Particles & Impurities)
-
First Filtration:
- Pour the collected dehumidifier water through a coffee filter or fine mesh sieve.
- This removes dust, mold spores, and large contaminants.
-
Sand & Gravel Filter (Optional):
- Set up a container with layers: gravel at the bottom, fine sand in the middle, activated carbon on top.
- Pour water through it to catch fine debris and absorb impurities.
-
Carbon Filtration:
- Use an activated carbon filter (like a Brita filter or DIY charcoal filter) to remove chemicals and improve taste.
- Replace the carbon filter every 2–3 months.
Stage 2: Purification (Killing Microorganisms & Pathogens)
-
Boiling Method (Best for Killing Bacteria & Viruses)
- Bring the filtered water to a rolling boil for 5–10 minutes.
- Let it cool before drinking.
-
UV-C Sterilization (Alternative to Boiling)
- Use a UV-C light sterilizer (like a SteriPEN) to destroy microorganisms.
- Follow the manufacturer’s instructions for exposure time.
-
Reverse Osmosis (Optional Advanced Purification)
- If you want ultra-pure water, run it through a reverse osmosis (RO) system.
- This removes heavy metals and dissolved solids.
Stage 3: Storage & Final Safety Checks
- Store purified water in a glass or BPA-free plastic container.
- Add a silver or copper coin to help prevent bacterial growth in stored water.
- Refrigerate or keep in a cool place to maintain freshness.
Optional Enhancements
🔹 Mineral Replenishment: After purification, add a pinch of Himalayan salt or a mineralizing filter to restore lost minerals.
🔹 pH Balancing: Use a pH test strip and adjust pH with alkaline drops if needed.
Conclusion:
This system filters out contaminants, kills bacteria, and makes dehumidifier water drinkable. It’s a low-cost and effective way to turn condensation into safe water.
Would you like a detailed diagram or a shopping list for building this system? 🚰🔧
Here’s a detailed shopping list and system diagram for your DIY dehumidifier water filtration system.
🛒 Shopping List:
Filtration Stage:
✅ Coffee filters or fine mesh strainer – Removes dust and large particles.
✅ Activated carbon filter (Brita-style or DIY charcoal filter) – Absorbs chemicals, VOCs, and improves taste.
✅ Sand & gravel (optional) – Natural filtration to remove fine debris.
Purification Stage:
✅ Stainless steel pot or electric kettle – For boiling water (kills bacteria and viruses).
✅ UV-C sterilizer (SteriPEN or aquarium UV light) – Kills pathogens without boiling.
✅ Reverse osmosis (RO) filter (optional) – Removes dissolved solids and heavy metals.
Storage & Dispensing:
✅ Glass or BPA-free plastic container – Prevents leaching of chemicals.
✅ Copper or silver coin (optional) – Antimicrobial properties to keep water fresh.
✅ Mineral drops or Himalayan salt (optional) – Restores lost minerals for taste and health.
🔧 Step-by-Step System Diagram
1️⃣ Collect dehumidifier water
2️⃣ Pre-filter with coffee filter / mesh
3️⃣ Pass through activated carbon filter
4️⃣ (Optional) Run through a sand & gravel filter
5️⃣ Boil for 5–10 minutes OR use UV-C sterilizer
6️⃣ (Optional) Use an RO filter for extra purity
7️⃣ Store in a clean, covered container
Would you like a visual diagram for clarity? 📌
I'll create a detailed visual diagram of your DIY dehumidifier water filtration system. Stay tuned! 🎨🔧
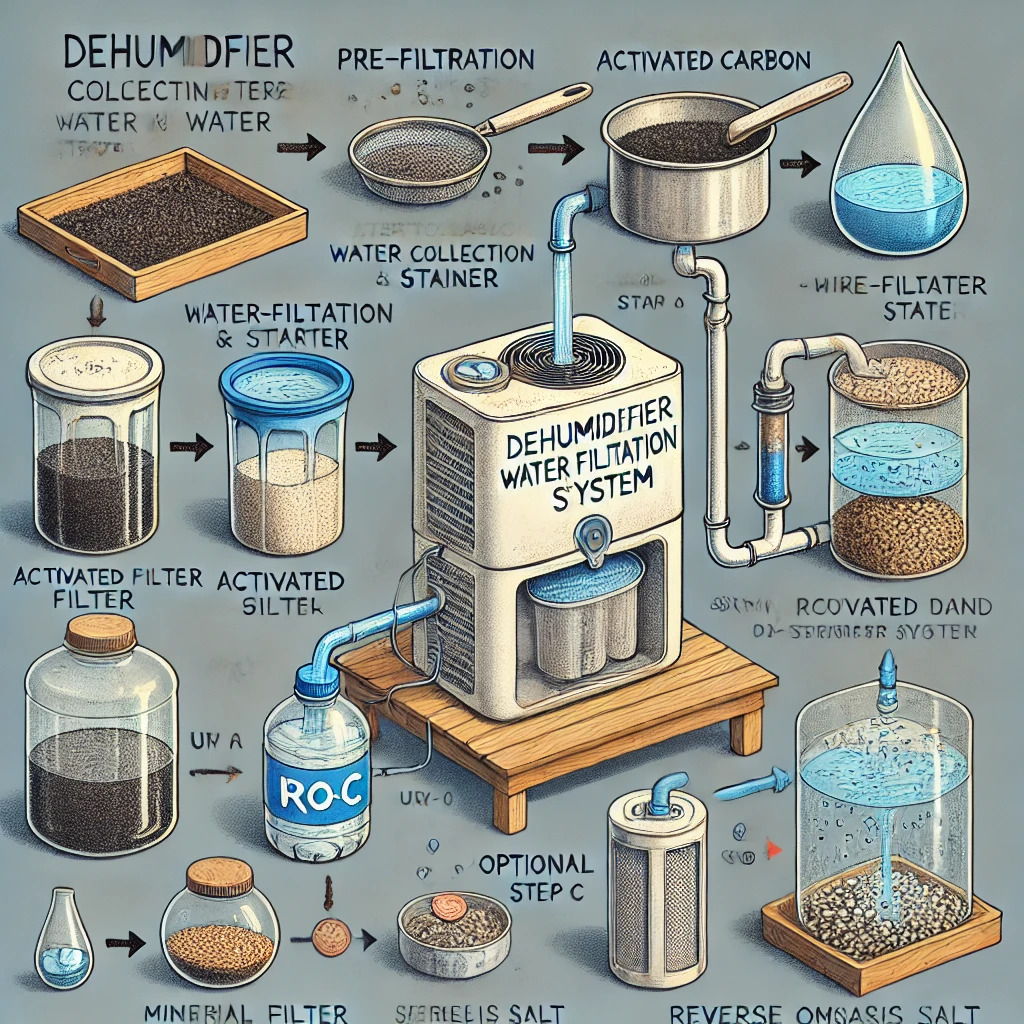
Here's the DIY dehumidifier water filtration system diagram you requested! It visually illustrates the step-by-step process of collecting, filtering, purifying, and storing water safely. Let me know if you need any modifications or explanations! 🚰🔧